Applies to
- Business
- Enterprise
Capabilities
Who can use this capability
You must be a Sysadmin on Smartsheet and Jira to configure the connector. You must be alicensed Smartsheet userto create or edit a workflow. You'll also need a Jira account with access to your Jira project.
Smartsheet for Jira Connector: Admin Setup (Cloud and Self-Hosted)
The Smartsheet for Jira Connector syncs information between Smartsheet and one or more Jira instances. This article provides instructions on setting up the Smartsheet for Jira Connector with Jira Cloud and Jira self-hosted Server.
Prerequisites
The Smartsheet for Jira Connector is available as a premium offering. For information about pricing and purchasing, pleasecontact our Sales team.
To set up the Smartsheet for Jira Connector, you must be an administrator in Jira. You must also have one of the following roles:
- In Smartsheet:Sys Admin or Connector Admin (this account-level role is unique to the Smartsheet for Jira Connector, seeSmartsheet for Jira Permission Typesfor more information).
- In Jira:Sys Admin
Your Jira version should meet the following requirements:
- Jira Cloud, or a Jira version up to version 9 that has not reached End of Life status. SeeAtlassian Support End of Life Policyto check your version's status.
If you want to set up the Connector with a self-hosted Jira server and a firewall, start with thisJira Connector Firewall Requirementsarticle.
Set Up a Connection Between Jira and Smartsheet
- Log in to theSmartsheet for Jira Connectorathttps://connectors.smartsheet.com/c/jira. If prompted to allow access to your Smartsheet account, selectAllow.
- Select the menu in the upper-left corner of the page and then selectAccount Admin.
- SelectRegister New Jira Server.
- Enter the URL of the Jira host you want to use.
- Accept or modify the default name, select your version of Jira, and then selectContinue.
- For Jira self-hosted versions 9 and above: Consumer Key, Consumer Name and Public Key is needed to create the application link in Jira.
You can register multiple instances of Jira with the Connector simultaneously. Repeat the above instructions for each additional Jira instance you want to register.
The Smartsheet for Jira Connector provides Public and Consumer keys for use in Jira to establish a secure connection between the two services. Copy these keys; you will need them later.
在内容和使用一个通用的电子邮件帐户Jira (example: smartsheet-jira@yourdomain.com) to set up the connection to Jira. You can not change connection owners. A generic account will help avoid the need to rebuild connections or workflows if the individual managing the connection to Jira leaves your organization.
Create an application link
To enable a connection between Jira and Smartsheet, establish and configure an Application Link (referred to as an AppLink in Jira documentation) between the two systems.
- Sign in to Jira with Jira Administrator permissions.
- Go toJira Settings.
- SelectProductsand, underIntegrations中,选择Application Links. In previous self-hosted versions of Jira, choose
>Applications, and selectApplication Links.
For Jira self-hosted versions 9 and above, selectCreate linkand select theAtlassian productoption.
This is for creating links to other Atlassian products and external applications that use OAuth 1.0 such as the Smartsheet connector.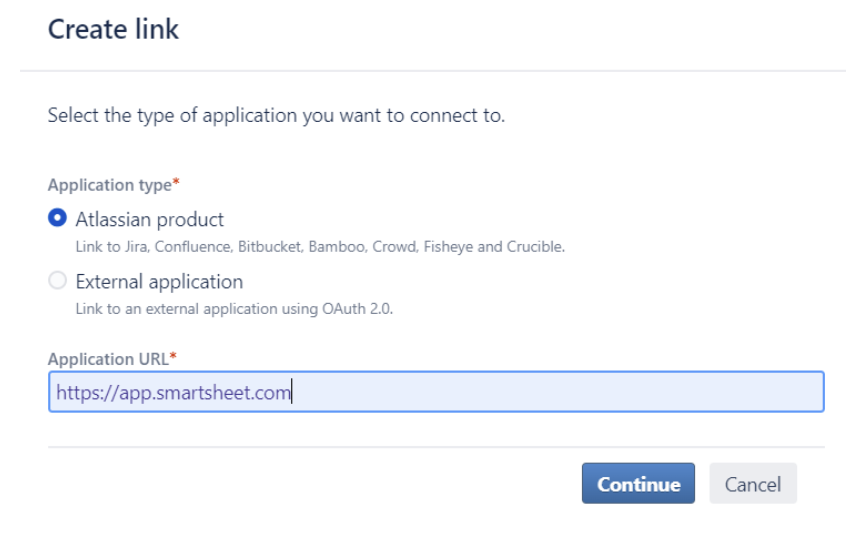
- Enter the URL of the application you want to link to (https://app.smartsheet.com), and then select eitherContinueor创建新的链接, depending on your Jira version.
If prompted with one of the following messages, selectContinueand leave the new URL as is.- No response was received from the URL you entered - it may not be valid. Please fix the URL below, if needed, and select Continue.
-OR- - The supplied Application URL has redirected once. Please check the redirected URL field to ensure this is a URL you trust.
- No response was received from the URL you entered - it may not be valid. Please fix the URL below, if needed, and select Continue.
- In theApplication Namebox, type Smartsheet. For应用程序类型, accept the default value ofGeneric Application, and selectContinue.
Additional steps for Jira self-hosted versions 9 and above:
Check theCreate incoming linkbox, then selectContinue.
Copy the Consumer Key, Consumer Name and Public Key from the Smartsheet connector configuration screen. - SelectContinue.


For Jira self-hosted versions up to 8, see below. For Jira self-hosted versions 9 and above, skip toComplete the connection with Jira version 9 and above.
Configure the Application Link for Jira Cloud or self-hosted up to version 8
Use the keys you created when you set up the connection between Jira and Smartsheet.
- In Jira, from theConfigure Application Linkspage (choose
>Settings>Applicationsand selectApplication Linksin the menu).
- Locate theSmartsheet Application Linkyou created in the previous section. Select the编辑icon
. In prior self-hosted versions of Jira, choose Settings
> Applications and select Application Links.
- In theConfiguredialog box, selectIncoming Authentication. Paste the Public and Consumer keys in the appropriate boxes. Scroll down to locate thePublic Keybox.
- If theRequest Token URL,Access Token URL, orAuthorize URLare required in your Jira environment, use this URL to populate those fields:https://api.smartsheet.com/2.0/token
- If aConsumer keyandShared secretare required, use theConsumer keyandPublic keyfrom the configuration window in the Jira Connector.
- At the bottom of the dialog box, selectSave>Close.
Additional Application Link Jira documentation
For more information about Application Links in Jira, see
Complete the connection with Jira version 9 and above
- Return to the Smartsheet Connector configuration and selectContinue.
- On the next screen, selectConnectto complete the connection from the Smartsheet side.
- The final step is to allow Smartsheet to access your Jira application, selectAllowon the next screen to do this.

Your connection between Smartsheet and Jira is now set up.