Applies to
- Pro
- Business
- Enterprise
Capabilities
Who can use this capability
Licensed Owners and Admins can select which fields appear in the cards.
Card View: Create, Edit, and Share Cards
In Card View,cards make up the work items or tasks in your project.
Field valueson cards display information about the task. Each card can display a total of 10 fields: the title field and up to 9 additional fields.
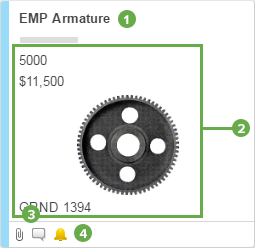
- The title of a card will always be the field value for the sheet’sPrimary Column. Check out the Help Center article on thePrimary Columnfor more information.
- Fields on the card display information about the task.
- AttachmentsandCommentsicons will be displayed if the task includes these items.
- The Reminders icon will be displayed if you have set reminders for the task.
Create a New Card
- In the lane that you want to add the card to, do either of the following:
At the end of the list of cards, click theAdd Cardicon.
-or-
Right-click a card and clickInsert AboveorInsert Below.
TheEditform will be displayed for you to fill in. - In theEditform, fill in the details and clickOK.
New cards will always be added to the end of your task list, even if you have specifiedInsert AboveorInsert Belowin Card View. That is, you will find the new task at the end of the list when you switch to Grid View.
Edit a Card
Add Data to a Card
- To edit or add data to a card, double-click it to open theEditform.
- Make the desired changes and selectOK.
To insert an image: hover over the field and select theMoreicon next to the name of the field that you want to edit. SelectInsert Image, select the source of your image and follow the prompts.
Change the Color Bar for a Card
There are two options for changing the color that appears on the outer edge of a card: you can change the color manually or you can change it automatically with a conditional formatting rule.
To change the color manually:
- Right-click the edge of the card.
- Select a color.
If you have Admin- or Owner-level sharing permissions to the sheet, you can change the color via conditional formatting by clicking theConditional Formattingicon in the toolbar and creating a rule.
有关条件formatti的更多信息ng, see theConditional Formattingarticle.
- Formatting applied with Conditional Formatting rules will override any manual formatting.
- The color for a card will remain consistent as you switch between Card View and Grid, Gantt, or Calendar View.
Share a Card Via Email or Request an Update
To share the contents of a card or to request input from others, right-click the card and clickSendorSend Update Requestto open theSendorSend Update Requestform.
By default, information from all available columns in the sheet (including Attachments and Comments) will be sent. That is, the information sent will not be limited to the fields displayed on the card. To exclude columns, SelectEditand uncheck any column name that you want to omit from the email.
For more information, seeSending Sheets & Rows Via EmailandUsing Update Requests.
Work with Fields
Cards display the data that is captured infields(in Grid View, this data is displayed in cells on the sheet). Each card will always display a title—the value for the title will always be the value of the Primary Column.
改变which fields appear in your cards
- SelectCard View Settings(the gear icon) in the upper-right corner of Smartsheet.
- Check or uncheck field names.
In Grid View, you can create visual hierarchy in a sheet by indenting to create parent and child rows. Details on this are available in the Help Center article onHierarchy. After creating hierarchical relationships, you can display the parent of a task on a card in Card View by selecting the(Title of Parent)field.
Add a New Field
- SelectCard View Settings(the gear icon) in the upper-right corner of Smartsheet.
- SelectAdd New.
When you add a new field in Card View, a new column of the same name will be added to Grid View. For example, if you add a checkbox field in Card View named Done, a column named Done (with a Checkbox column type) will be added as the rightmost column in Grid View.
Edit the Properties of a Field
To edit the properties of an existing field—for example to change the type or the label—you will need to switch to Grid View (click Grid View in the left toolbar) and edit the column properties from there. For more information, seeInsert, Delete, or Rename Columns.