The Smartsheet Calendar App is a flexible, configurable calendar add-on that allows you to connect your Smartsheet data and forms to visualize your events in multiple views or by color-coded categories.
Use case examples include:
- Campaign Management:Manage marketing activities across teams.
- Retail Promotions:Coordinate promotions across departments.
- Team Schedule:Track team travel for visibility into when team members will be out of the office.

Keep your teams organized with the Smartsheet Calendar App
The Smartsheet Calendar App is a premium add-on that helps you build flexible, customizable, and shareable calendars using your Smartsheet data. With the Calendar App, you can:
- Color-code by a primary and secondary category
- Easily export the calendar view for email or print
- Sync with existing project data

Sign in to the Smartsheet Calendar App
To access the Calendar App, follow these steps:
- On the leftNavigation Bar, selectLauncher.
- ChooseCalendar.
Another way to access theCalendar应用程序is by visiting this URL:calendar.smartsheet.com.
If you have trouble accessing the app from theLauncher,please seeAccess Premium Apps and Templates with the Launcher.
Once you’re signed in, you’ll see theCalendar Viewspage. Any calendars you’ve created or have been shared with you will be displayed on this page. To visualize a calendar, select it by its name.
Don’t see all the calendars you expect? In the upper-right area of the app, selectRefresh.
To narrow your search, use theFilterlist or type the calendar name in the Search bar.
Create a basic calendar view
Create new calendar views in theCreate New Viewwizard. To start the wizard,
- SelectSmartsheet Calendar.
- SelectAdd New.
Continue reading to learn the steps in each tab of the wizard.
Step 1: Select Sheet
Your sheet or report must include at least one date column.
- Select the sheet or report that contains the Smartsheet data you want to display.
- Once you’ve selected the sheet, selectNext.
Step 2: Choose a View
To choose the default view for your calendar, select one of the following tiles:
- Monthly
- Daily
- Weekly
- Multi-Month
- Quarterly
- Day-Month
After your calendar is created, you’ll have the option to switch to any of these views.
Step 3: Map columns
Map the columns from your sheet to their corresponding fields in the calendar:
- In theSmartsheet Columnssection, select which columns contain the data you want to display in the calendar view. Fields with a red asterisk are required fields.
If you're using a report, give your columns consistent names. If you use dropdown columns in the source sheet, your data will be more consistent and have a cleaner calendar view.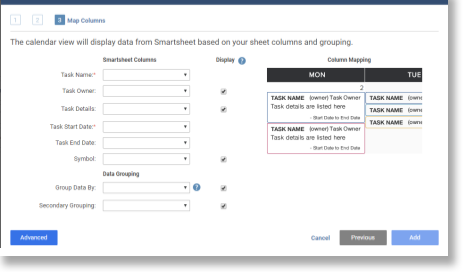
- Optional: In theData Groupingsection, select any category or subcategory groupings you’d like to use to make the items that appear on the calendar show up as specific collections. These groups will appear on the left side of the calendar and will drive the color coding in your calendar.
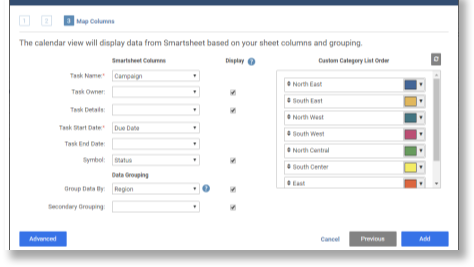
Once you choose items underData Grouping, you can specify which color is assigned to each category. - If you’re ready to see the results, selectAdd.
- If you want torefine your calendar with advanced features, selectAdvanced.


Refine your calendar with advanced features
You may want to do more once you get a basic calendar working. For example, you may want to:
- Add additional Columns
- Sort tasks
- Change the date and time display and format calendar tiles
- Change the logo that appears with the calendar
- Show or hide weekends

When you select theAdvancedbutton, its name will change toBasic,and you'll see the following tabs:
- Additional Columns
- Time & Design
- More Options
- Confirm
To proceed to theAdditional Columnstab, selectNext.
Read on to learn more about the succeeding tabs/steps in the wizard.
Step 4: Add more columns to your calendar
- To add more information to your calendar, in theAdditional Columnstab, use the following sections:
- Additional Columns:Choose columns you’ve already mapped.
- Sort Columns:Sort your tiles based on column data.
- SelectNext.
Step 5: Configure how the dates and time periods are displayed
Use theTime & Designtab to further configure the display of dates and time periods. For example, specify the number of periods (columns) you want your data broken into to configure the date format. Then, configure the style of the calendar tiles.
Step 6: Edit other calendar details
Use theMore Optionstab to do the following:
- Add a calendar name
- Identify the start day of the week
- Identify the quarter-start month
- Show tasks on weekdays only, hide weekends, or show both weekdays and weekends
- Open and find the web form link
- Set up how the calendar will appear to users and what they can do in the calendar.
Allow Attachments
Select this option if you want people to be able to attach files to Calendar App tasks.
Files attached to comments will appear with the comment. You won't see the attachments in theAttachments列或一个日历应用程序的任务。
Allow Comments
Select this option so others can comment on tasks within the Calendar App. This setting is enabled by default when you create a new calendar.
When you add comments to a calendar, they’ll also be added to the source sheet or report what the calendar references.
Use the @mention capability in commentsto increase your calendar entries' visibility.
Users must have at least Editor-level sharing permissions on the source sheet or report to add comments to the calendar. People shared to the source item with Viewer permissions can view comments in a calendar.
Allow New Events
Allow anyone with Editor-level sharing permissions to the source sheet to add events directly to the calendar view.
Web Form Link
If the source sheet includes a form, paste the form's link in the Web Form Link field. When you add the web form link to the calendar, you can access theformfrom the Calendar App.
To access the web form from the Calendar App:
- In the upper-left area of the Calendar App, select the dropdown icon.
- Then, chooseOpen Web Form.
使用454年的日历
To allow 454 Calendar as a display option, select the454 Calendarcheckbox. You can also selectDefault 454 Calendarif you want this to be the default display option.
In a 454 calendar, the calendar year is divided into months based on this format: 4 weeks – 5 weeks – 4 weeks. The layout of the calendar lines up holidays and ensures that the same number of Saturdays and Sundays appear in comparable months. (The 454 format is commonly used in retail businesses to more accurately compare sales between years).

Step 7: Verify the settings you set up
In theConfirmtab, review and verify the settings you edited.
If you need to make changes, follow these steps:
- SelectPrevious.
- Find the page that contains the options you need to change.
- Make the necessary adjustments.
Once you’re satisfied with the results, selectAddorUpdate.
Make changes to an existing calendar
Only the owner of the calendar can edit the configuration settings.
你如何开始改变取决于what you’re looking at in the Calendar App:
If you’re viewing a calendar:In the upper-left area of the calendar, select the dropdown arrow. Then, selectSettings.
- If you’re in theCalendar Viewspage:Go to the row of the calendar you want to edit. Then, select
 .
.
Share or publish the calendar
If you’re on a different page in the Calendar App, go back to the Calendar Views page to search for the calendar you want to share.
To make the calendar accessible to the sheet or report collaborators
Users with access to the source sheet or report already have access to the calendar. Users with Editor-level sharing permissions to the source sheet or report can edit information directly in the calendar view.
Sharing a calendar will create a share link (direct link) to the calendar and will ask users to log in.
To share the calendar view with people who aren’t shared to the sheet or report, and to make it visible on the Calendar Views page:
- In theCalendar Viewspage, go to the row of the calendar.
- Select
 .
. - Turn on theSharingtoggle.
- Enter the email addresses or the domains of the users to add.
- (Optional) Copy the link.
- ClickSave.
Let others know about the shared calendar view
People shared to the calendar view can access it from the direct link. They can also view the calendar bylogging in to the Calendar App.
If you use Smartsheetdashboards or portals, consider including a link to the calendar view there to make it easy for others to find.
Publish a calendar
You can publish a read-only version of the calendar.
Before you begin
- To publish a read-only calendar, you must be the Owner or Admin of the calendar's source sheet or report.
- If you’re the Owner of a published calendar, you can directly edit it.
- If bothPublishandSharingoptions are on, the Owner, Admin, or Editor of the calendar’s source sheet can directly modify the published calendar.
- Before editing a published calendar, Owners, Admins, and Editors must first sign in to the Calendar App.
To publish a read-only calendar
- In theCalendar Viewspage, go to the row of the calendar.
- Select
 .
. - Turn on thePublishtoggle.
- Copy the link.
- SelectSave.
If you want to remove access to a published calendar
- In theSharingdialog, turn off thePublishtoggle.
- Refresh your browser.
After doing this, the old URL will become invalid.
Sharing vs. Publish
Sharing is limited to individuals who are shared to the sheet or report or who are specifically listed in theAllow Emails/Domainsbox. The share link will require users to log in.
A published link provides access to the calendar to anyone who has the link. Users who access the published calendar won’t have to log in to theCalendar App.
Transferring calendar to another user
Before you begin
Make sure the new owner is anAdminof the calendar’s source sheet.
- In theCalendar Viewspage, go to the row of the calendar you want to modify.
- Select
 .
. - Enter the new owner’s email address.
- SelectTransfer.

If your email address changes, you won't be able to edit your calendars. To fix this,contact Supportto let us know the old email address and new email address for a transfer of ownership.